Do you want to learn how to limit your Axis PTZ camera movement?
Yeah, you are in the right place. Here you can learn how to do that. 😉
But first, you need to understand how the camera uses the coordinates.
The Axis cameras coordinates
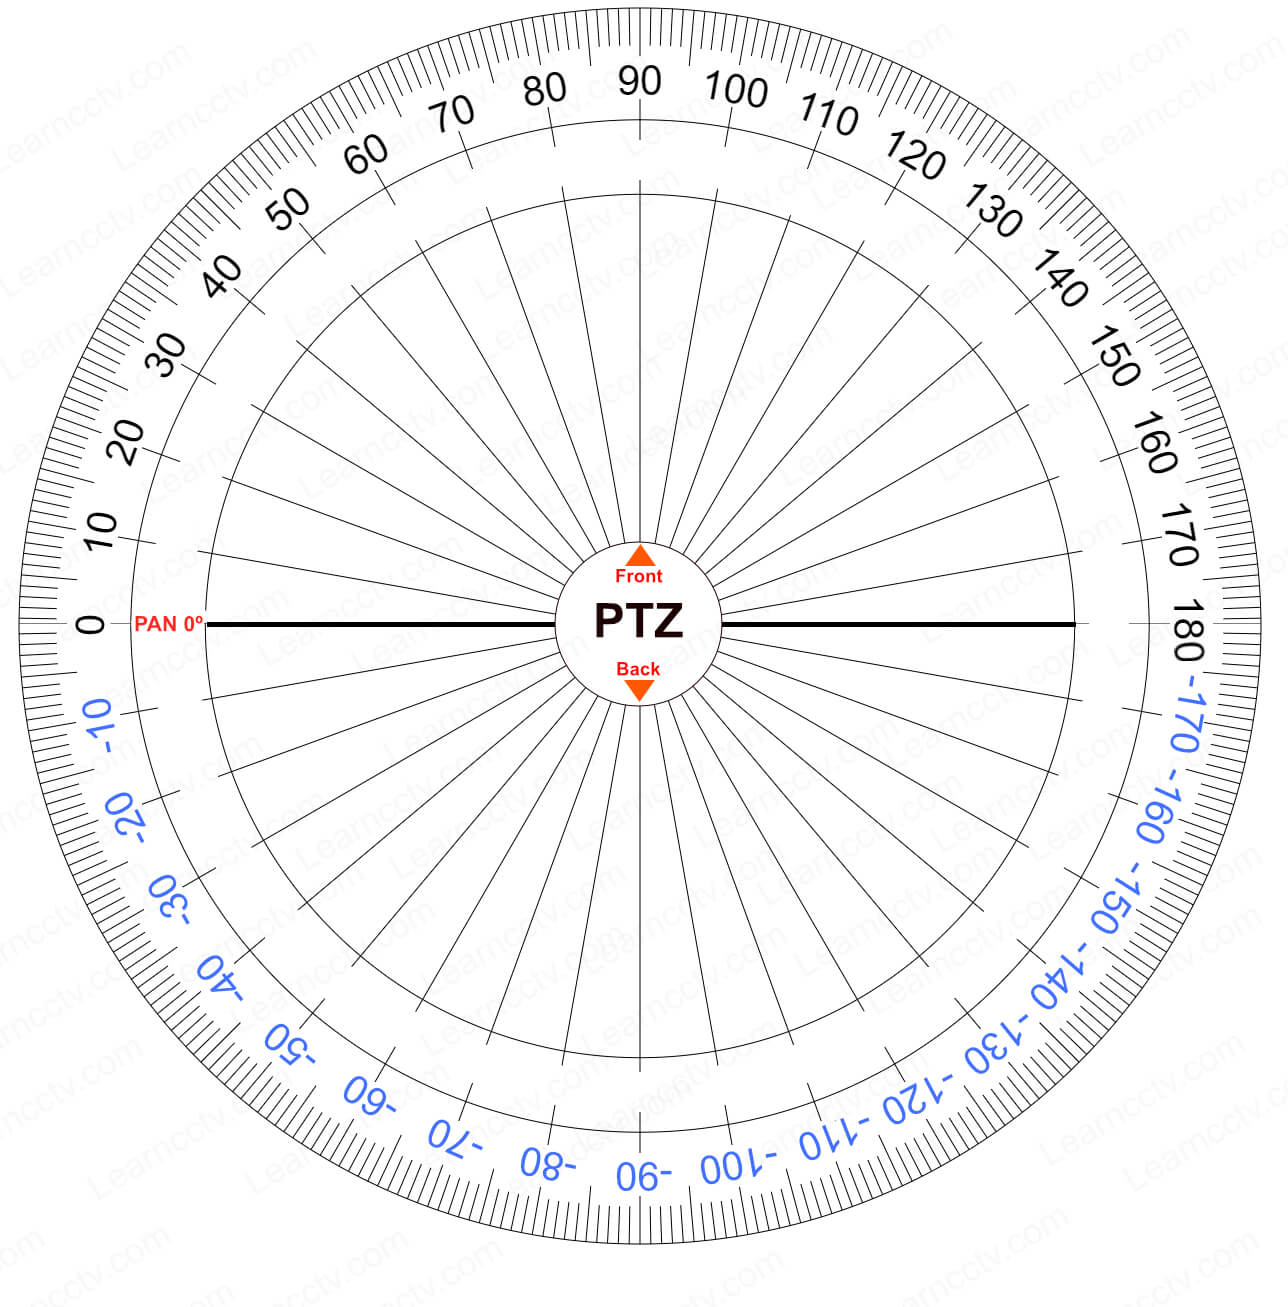
Please take a look at the following picture to understand how the Axis cameras use the coordinates, and then you can set up the PAN limits the way you want to.
The Axis PTZ camera is represented in the center of the picture; its lens is pointing to the front (90º) and its back pointing to the back (-90º).
In fact, I'm considering the positions 0º to 180º as the frontal part of the camera.
Then the camera uses negative coordinates from -180º o 0º for the back part.

So, the camera can rotate (PAN) from 0º to 180º from left to right and then continue the rotation from -180º to 0. (It's not the traditional 0º to 360º system).
As soon as you understand that, it's easy to choose the coordinates you want to have your camera working on, and then you basically limit the camera movement.
Let's take a look at a practical example so you can better understand how it works.
How to limit an Axis PTZ camera movement
Just imagine you have your Axis PTZ camera installed on a wall.
You don't want the camera rotating back to show you just a bunch of bricks.
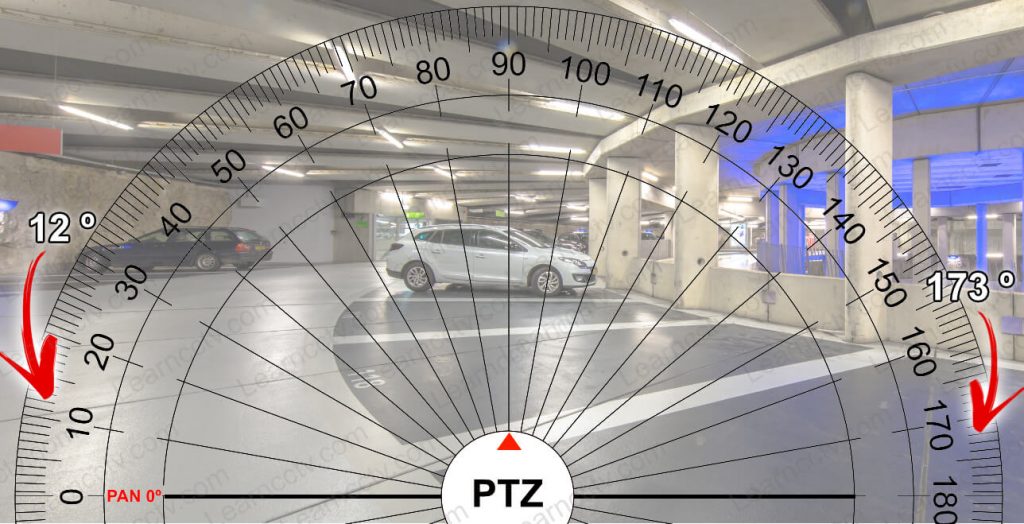
So, let's limit the camera to PAN from 12º to 173º, as represented below.
On the left side, there's a PAN 0º mark; that's the reference point to the camera.
You can install your camera and configure this point according to your needs.
So, now we just need to "tell the camera" to keep its PAN movement between 12º and 173º where you have your area of interest. No negative coordinates are used.
Perhaps you may be wondering, "how do I know what the coordinates are? "
That's easy, my friend. You just need to use overlay text to display the coordinates on the screen and move the camera to the desired position to get them.
==> If you don't know how to insert overlay text to the camera, please read the article: Axis PTZ - How to add coordinates on the screen.
OK, once you have the coordinates, you can configure your camera.
Let's see how to do that...
Set up the PAN 0º (old web interface)
Remember that you need to "tell the camera" where the 0º is.
Here's how to set up the New Pan 0º:
- Open the camera Setup screen
- Click on PTZ >> Preset Positions
- Click the button "Set new Pan 0º"
Set up the PAN 0º (new web interface)
The new web interface shows this option as "Save as Pan 0º".
This feature is available at the Settings >> PTZ >> Limits.
In the same tab, you can find the button to set the PTZ limits.
It's essential to disable the E-flip feature before setting the PAN limit.
(If you don't, a message pop-up on the screen to alert you).
Set up the camera PTZ limits (old web interface)
Here are the steps to set up the PTZ limits on an Axis camera:
- Open the Setup screen
- Click on PTZ >> Advanced >> Limits
- Enter the Left and Right coordinates for the PAN
- Enter the Upper and Lower coordinates for the TILT
- Save the configuration
And it's done.
Set up the camera PTZ limits (new web interface)
The new web interface allows you to set the limits without entering the coordinates. It's an easy and intuitive process...
Here's how to set up the limits in an Axis camera with a new web interface.
- Click on Settings
- Go to PTZ >> Limits
- Click the button "Set Limits"
- Move the camera to the desired LEFT position
- Click the Pan LEFT button to set the limit
- Move the camera to the desired RIGHT position
- Click the Pan RIGHT button to set the limit
- Repeat the process for the TILT limit
- Save the configuration (click "Done")
The new way is much simpler, isn't it?
There's no need to find coordinates.
And now you know how to set up the limits on both models.
Please share this article with your friends.
