In this article, you are going to learn how to connect a DVR to Angelcam.
The Angelcam DVR setup is a simple process that takes about 5 minutes...
Follow these steps to set up a DVR to work with the Angelcam platform:
- Check if your DVR supports the H.264 codec and RTSP encoding;
- Test the local video streaming with the RTSP encoding.
- Setup the router port forwarding.
- Setup Angelcam's platform.
==> The configuration also works with IP cameras, to learn more about the models, check the article: Angelcam camera list.
How cloud recording works
Before following the steps to set up the DVR to record in Angelcam's cloud it's important to understand the concept behind the cloud recording.
The picture below shows a DVR recording locally in its internal hard drive disc, while a copy of the video streaming is sent to a remote server.

That's the basic idea to guarantee that you have a safe security system that is redundant. To learn more read: How to record CCTV camera on the cloud.
Local vs remote recording
For the local site, the DVR can use the best video quality recording, which means the video can a have high-resolution and frame rate.
On the other hand, for the remote recording, the video quality must be reduced in order to save bandwidth and storage.
Using the right profile
In your DVR, you can create different profiles for local and remote recording.
That means you can set up at least two profiles with specific resolution, frame rate and compression for each type of recording (local and remote).
So, you just need to have a profile #1 for the local recording and a profile# 2 fo the remote recording, is very simple, isn't it?
The H.264 CODEC and the RTSP encoding
Please don't be scared with these terms, you just need to know that the H.264 is an algorithm to compress the video and the RTSP is a universal method to encode and send the video through a network (such as the Internet).
The router configuration
In order to send the video from your local network to the remote server (Angelcam's sever), is necessary to configure the router for port forwarding.
Port what??? Calm down, port forwarding is just a fancy name for a set of rules that are created into the router to allow the Internet traffic to enter and exit your network. Don't worry, you are going to see how to set up a router.
Step-by-step Angelcam DVR setup
OK, enough with the theory, let's just dive into the setup and connect a DVR to Angelcam. You just need to find out what's the command you must use to request the video stream.
This is known as "RTSP command" and when the DVR receives it, it starts streaming a compressed video to the chosen destination.
1. Check if your DVR supports H.264 and RTSP encoding
There is a compatible device list in the Angelcam's website, you can check if your camera is compatible or look for information on the user's manual.
If the information is not available in the manual, contact your dealer or manufacturer's support team to get help.
Using software to find out the RTSP command
Just in case you are wondering, "but I don't have the device manual, and I can't contact the dealer or manufacturer", there's a way to try testing your device to find out what is the RTSP streaming command to connect a DVR to Angelcam.
You can use the ONVIF Device Manager software and if your DVR is compatible, it can find the command, otherwise, it can't help you.
Watch the video below to see how to use the software.
2. Test the local video streaming with the RTSP encoding
Time to test the local stream from the DVR to the local computer.
The idea is to make sure the RTSP command works in your local network before trying to use it in the Angelcam setup. One step a time !
The RTSP command below is streaming the video from the device with IP 192.168.2.154 and port 554, the DVR channel is number 4.
rtsp://192.168.2.154:554/cam/realmonitor?channel=4&subtype=0&unicast=true&proto=Onvif
IMPORTANT
Just keep in mind that this command is NOT the same for all DVRs, each manufacturer has its own RTSP command. Find out yours.
Use the VLC software to send the RTSP command from your laptop to the DVR and check if everything works fine. Watch the video below.
3. Setup the router port forwarding
Now that you know the local RTSP command is working is time to configure your router with the information to connect the DVR to the Angelcam platform by redirecting the requests that come from the Internet to the DVR that is inside your network.
Just login to the router and look for the port forwarding configuration.
Every router is different, so the configuration menu differs according to the manufacturer. Sometimes you can find the menu with names such as NAT, PAT, Port Forwarding, Port Redirect, etc.
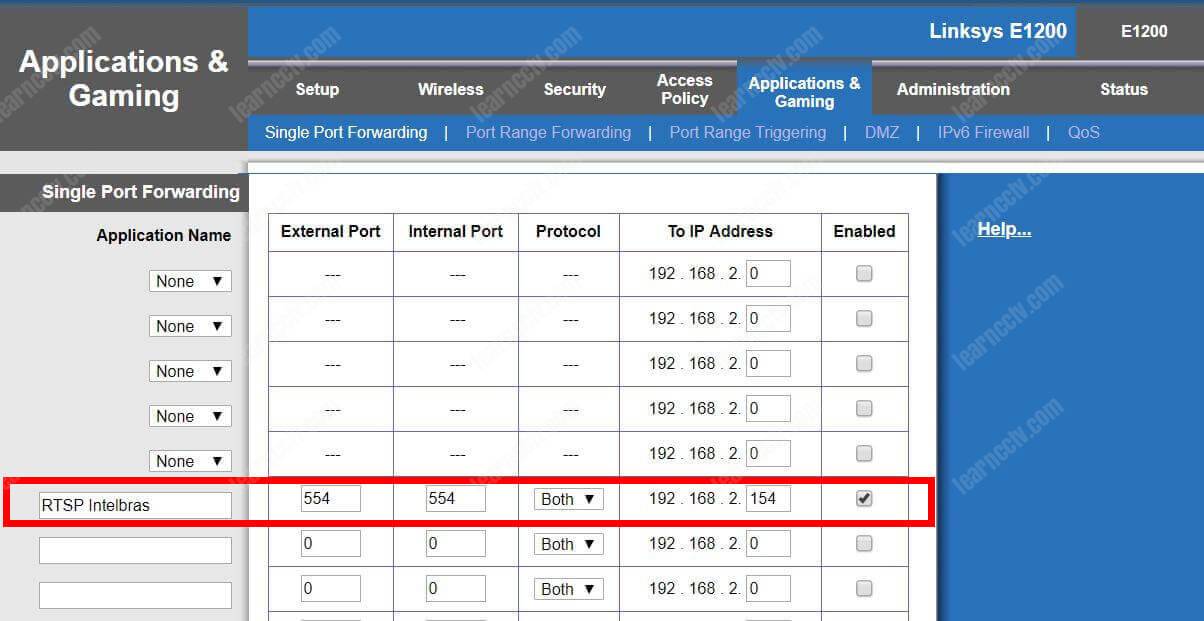
On my router (Linksys 1200), the menu is under the "Application & Gaming --> Single Port Forwarding" Menu.
The picture below shows the configuration, it's necessary to inform the RTSP port (554) the protocol (both) and the DVR IP address (192.168.2.154).

This configuration is basically saying: "Hey router, every time you receive a request from the Internet to the port 554, please redirect the traffic to the IP 192.168.2.154" (which is the DVR).
4. Setup the Angelcam's platform
Now it's time to configure the Angelcam's platform to get the video stream from your DVR. You just need to have some basic information:
- The router external IP address
- The RTSP command for your DVR
- The RTSP port used by the router (usually 554)
- The user and password for your DVR
- Which DVR profile is better for remote recording
How to connect a DVR to Angelcam
Just to the Angelcam website at https://angelcam.com/cva to create an account if you don't have one or just login if already have an account.
Click in the menu Connect Camera --> + Connect a new camera

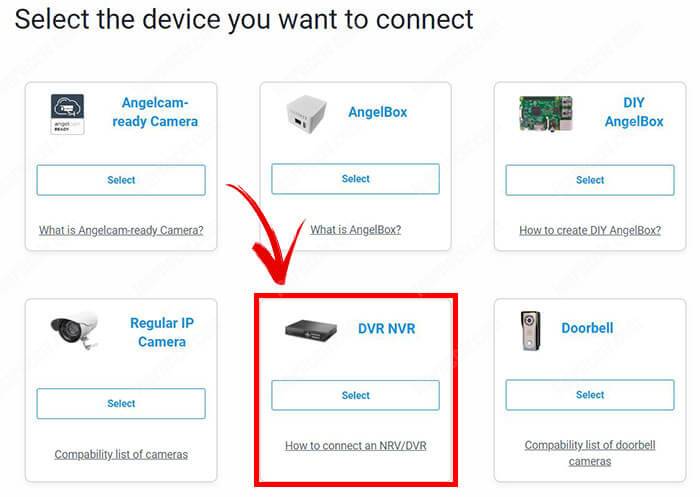
Click the menu DVR NVR to select the type of device.

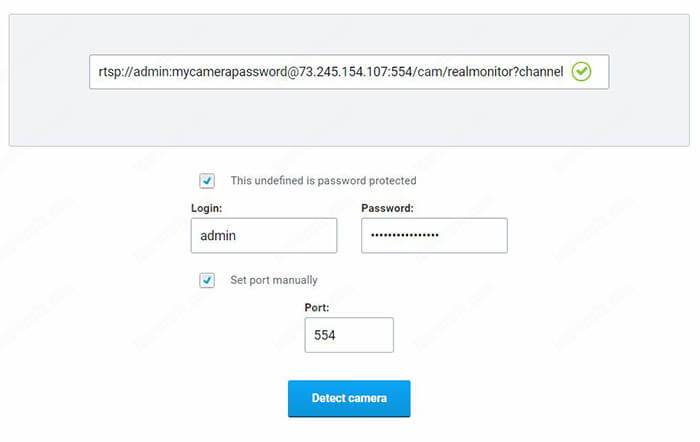
Type your DVR's RTSP command, but remember to use the router external IP. The system will show you a green checkmark if the command is OK.

Check the boxes and enter the DVR login, password and port information

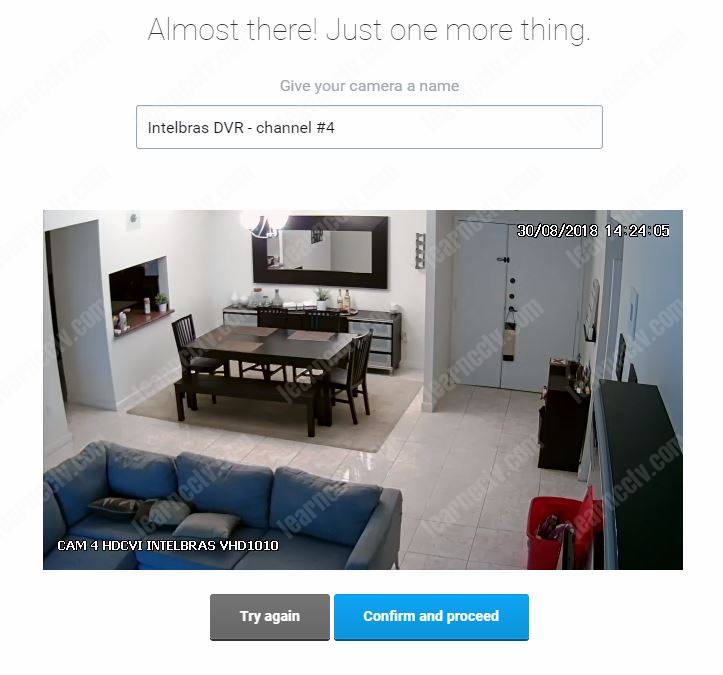
Click the button "Detect camera" and in the next window give a camera a name and click the "Confirm and proceed" button (see the picture below).

And you're done! Congratulations your DVR is recording in Angelcam.
Conclusion
It's easy to configure a DVR or NVR to stream videos to the Angelcam.
To connect a DVR to Angelcam you just need to make sure the RTSP command and the router configuration are correct, the rest of the steps are very easy to setup.
During the setup process, you can change the video profile you are sending to the Angelcam's server by just using the correct parameters, in my example, I just need to change the subtype=0 to subtype=1 to use the second profile created in the DVR to use less bandwidth.
rtsp://<IPaddress>:<port>/cam/realmonitor?channel=4&subtype=0&unicast=true&proto=Onvif
If you have a DDNS setup in place just use the URL during the setup.
Don't be intimidated to set up your system, just do it one step at a time to make sure it's working before configuring the next one.
Want to become a better professional ?
If you want to become a professional CCTV installer or designer, take a look at the material available in the blog. Just click the links below:
Please share this information with your friends...
