In this article, I show you how to add Axis cameras to a Hikvision NVR.
I've tested this integration in my lab, and now I want to share that with you.
The following picture shows an Axis P1365 MKII, a P3225-V MK II, and a P5624-E MK II displaying live video in a 4-channel Hikvision NVR DS-7604NI-E1/4P.

Hikvision NVR with Axis cameras
Let's see how it works...
Add Axis cameras to a Hikvision NVR via ONVIF
A Hikvision NVR works with different camera brands.
It's possible to choose which one you want to use by selecting the protocol on the NVR's camera management interface, as shown in the picture below.
As you can see, the ONVIF and Axis protocol are available in this NVR.
Sometimes, the direct integration via the manufacturer protocol doesn't work.
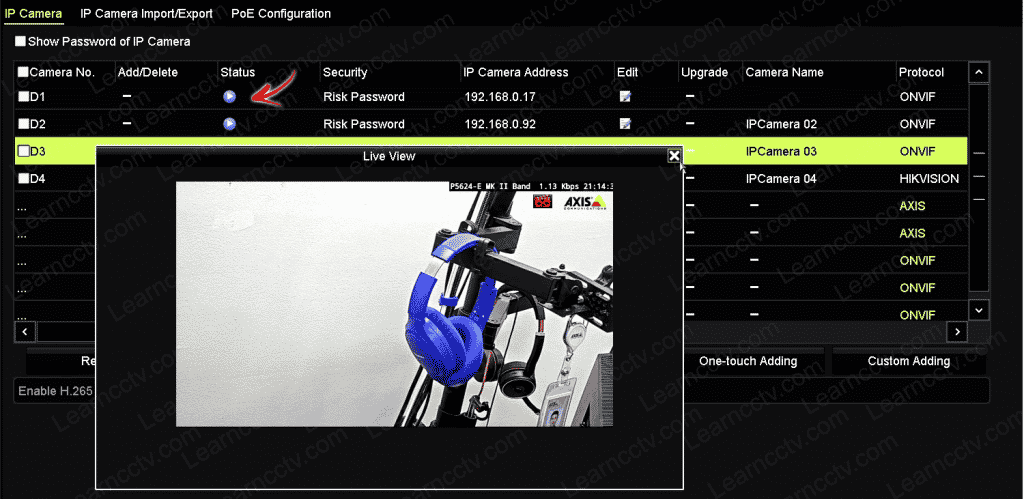
If that's the case, you can always try using ONVIF, as shown in the picture below.
Axis camera connected to a Hikvision NVR via ONVIF
As you can see, there's a blue play button icon that indicates the integration is OK.
Pay attention to the protocol. It's ONVIF.
The steps to add Axis cameras to a Hikvision NVR
It's necessary to enable the ONVIF protocol in the Axis cameras and work on some adjustments to have the Hikvision NVR correctly communicating with the camera.
One of these adjustments is the correct ONVIF profile configuration.
Let's break it down...
Create an ONVIF user in the Axis camera
Here's the step-by-step process.
- Log in to the Axis camera via a web browser;
- Go to Settings (or) Setup and look for the ONVIF menu;
- Click the "Add..." button to create a new ONVIF user;
- Type the username and password;
- Add the user to a group;
- Click "OK" to save the configuration.
Creating an ONVIF user in the Axis camera
You can create any username you want; it's not mandatory to use root or admin.
Add the user to the media group, which is enough to have everything working.
Adjust the ONVIF profile
You need to make a small change in the ONVIF profile in the Axis camera.
Please don't skip this part, or you will see the "No enough Bandwidth" error message while trying to add the Axis camera to the NVR.
In the ONVIF profile screen, select the "default_1 h264" profile and change the bitrate to a lower value such as 2048 Kbps (2 Mbps) or 4096 Kbps (4Mbps).
The value you are going to use here depends on the camera you are using.
A FullHD camera (1920x1080) usually uses around 2 Mbps, but it requires more bandwidth depending on the installation location and other factors.
If you have enough bandwidth in your network, just allow the camera to use 4Mbps or even higher values. It's up to you; I think 4 Mbps is a wise choice for most cases.
Add the Axis camera to the NVR
Follow the steps to add the Axis camera to a Hikvision NVR:
- Right-click the mouse button;
- Click on "Menu";
- Click on "Camera";
- Select the first camera and click "Edit";
- Use "Manual" as the Adding Method;
- Enter the IP camera;
- Choose the ONVIF protocol;
- Type the username and password;
- Click "OK" to save the configuration.
How to add Axis camera to a Hikvision NVR
Remember to use the camera's ONVIF username and password.
Please do NOT enter the "root" credentials you use to log in to the camera.
If everything is OK, you should see the cameras listed with a blue playback button.
And it's done.
Now you have your Axis camera working in the NVR.
If you still can't get it working, please watch the video below.
Video: How to add Axis cameras to a Hikvision NVR
Hit the play button to watch the video. Enjoy !
That was easy, right?
I hope this article can help you, please share it with your friends.
