Apart from the footage, you can also upload snapshot pictures from your Hikvision DVR/ IP camera. Plus, this means you can have both your locally stored footage from your recorder and one recorded on the cloud.
A great plus is that it gives you a backup to your footage in case your recorder is damaged or stolen.
Set up Hikvision cloud recording on Dropbox
The following steps will show you how to record backup footage from your Hikvision to Dropbox correctly.
Step 1
Type your recorder’s IP address on the search bar on a web browser. It is recommended to use Internet Explorer as your web browser. Then log in with your credentials (Username and Password)
Step 2
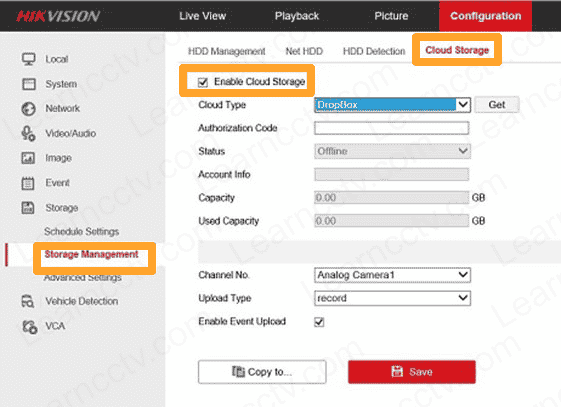
Locate Storage, and open Storage Management. You should now see a Cloud Storage option.
Cloud Storage needs to be enabled. Under the Cloud Type list, select DropBox. Then click on “Get” to receive an authorization code to enable your DVR to access your DropBox account and record footage.

Step 3
Once you have clicked the “Get” button, you will be redirected to a new page that will ask you to allow the connection between your DVR and DropBox.
The DVR will need to access folders and files stored in the DropBox account, so choose “Allow.”
Step 4
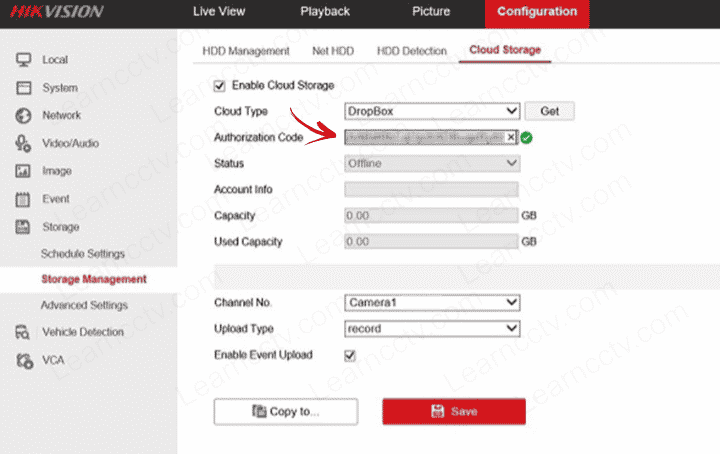
Copy the authorization code that was generated, then paste it into the Authorization Code box to finish the approval step.

Select the “Save” button, and once the settings are applied, the Cloud Storage status should switch from Offline to Online.
Your account’s information will also be displayed, including your name, total capacity, and, most importantly, the used capacity.
Step 5
Finally, you’ll need to alter some settings to set up Hikvision cloud recording on Dropbox.
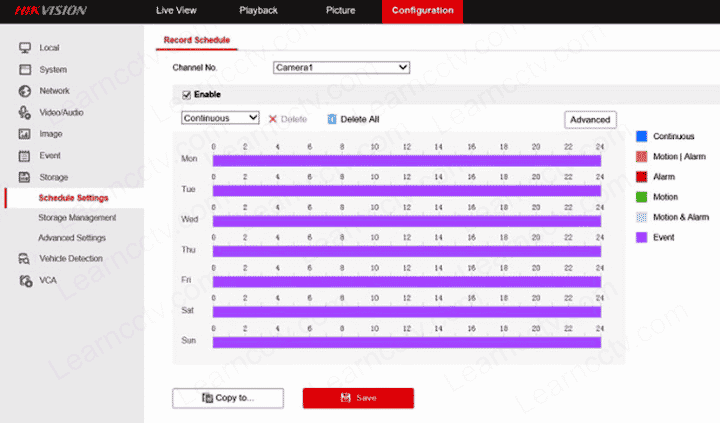
In the Storage section located on the right, select Schedule Settings to arrange a recording schedule. Choose the cameras you want to have cloud recording for, and enable scheduling, then set your schedule to your particular needs.
Below, you will find an example of settings to record all day.

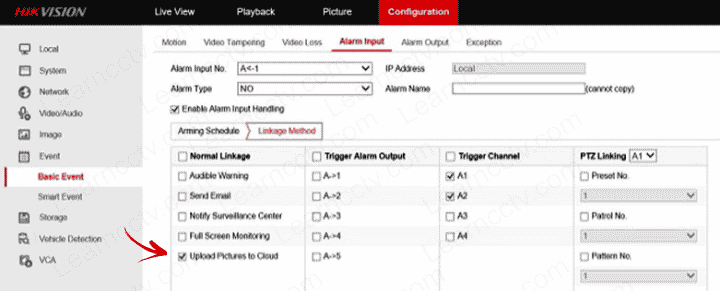
Under Event, select Basic Event and then choose Alarm Input. You can then enable the Alarm Input Handling. Finally, upload pictures to the cloud from the “Trigger Channel” list, choose channel 1. Make sure the “Upload Picture to the Cloud” is checked, then save to apply the settings.

Moving your footage to DropBox will allow you to have a backup. This creates a folder called Record. Once it occurs, any event such as motion detection on the channel will create a new folder with a date under the Record folder.
In our example, the folder that will save the recordings is titled A1. Note that the recordings will be saved in an MP4 format and can be reviewed by clicking on the file’s name.
Final Thoughts
When you set up Hikvision cloud recording on Dropbox, you get more resources from your footage. Apart from being able to playback the footage on DropBox, you can also download files or share them with others.