In most cases, interference and noise in the image can be eliminated with the use of cables, power supplies, and improvements in the quality of the infrastructure, but there are situations where the problem is different and you need to dig deeper to find a solution to your problem.
In this article, I will talk about possible problems and solutions to eliminate noises and interference in a security camera and also explain when these noises are a natural part of the image in a CCTV system.
Let's start talking about noise...
What is CCTV noise?
People normally associate the word noise with sound, but this term is also used to refer to the undesirable grainy-look image in your TV or monitor.
Noise can be found on professional and regular cameras, you can see it even on your mobile phone when you take a picture or record some video with a low-light condition. So sometimes the noise is part of the image and you can't eliminate it because it's a camera or light condition limitation,
Sometimes, however, you have plenty of light in the environment and still get that ugly noise on the screen, usually, this kind of noise is related to some electromagnetic interference, incorrect grounding or bad infrastructure.
What causes interference and noise in the CCTV cameras?
There are several factors that can cause interference problems in a security camera. Below is a list of some of them:
1. Use of improper power supply.
2. Use of poor quality cables
3. Use of poor quality cameras
4. Use of poor quality converters
5. Incorrect grounding
6. Camera Warm Up
7. Poor connections
8. Lack of adequate lighting
See below in detail each of these factors that may cause interference problem and noise in the CCTV camera image.
1. Use of improper power supply.
To operates correctly, a security camera needs to receive adequate power according to the manufacturer's manual.
In most CCTV projects 12VDC (direct current) voltage is used, but there are also cameras that work with 24VAC (alternating current) power.

In addition to proper voltage, the camera should also receive enough current to operate properly and if the technical specifications are not met, problems related to interference and noise may appear, in addition to other problems.
The proper voltage for the camera
A traditional CCTV camera such as a bullet or dome model installed in homes and small businesses usually requires a 12VDC power supply with a variation of 10%, meaning the camera can support voltage 10% above (13.2 VDC) or 10 % below (10.8VDC) the standard 12VDC.
Low-cost and unbranded cameras may not have such a tolerance of 10%. Make sure your camera has this voltage tolerance, consult your dealer.
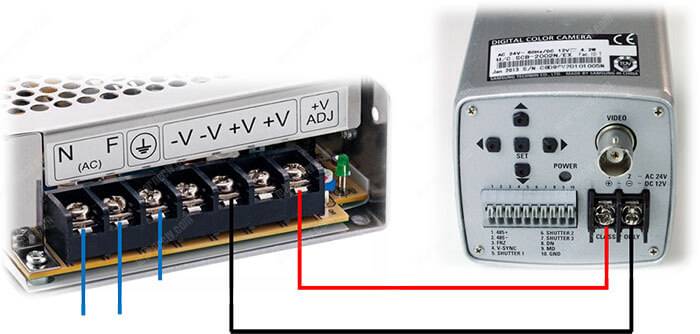
There are power supplies that have a potentiometer that allows you to change the voltage sent to the camera, instead of sending 12VDC, the voltage can be increased to compensate for the drop that occurs in the cable.
Note in the image above that on the right side there is a pot that when rotated clockwise increases the voltage that is sent to the camera.
If you are experiencing problems with your camera, you can measure the voltage coming into the camera and gradually increase the voltage for testing.
You can also replace the cables to compensate for the drop voltage.
Enough power for the camera
The camera also requires a minimum current, which is usually less than 1A (ampere) for our example of a traditional CCTV camera.
The indication of the electrical current required for the camera to operate must be in the product manual, consult your distributor to be sure about the consumption of the camera, because in some cases with the use of infrared illumination the required current may be higher.
2. Use of poor quality cables
Coaxial cables
Poor quality coaxial cables can cause problems by not correctly isolating the electromagnetic interference in place.
When this type of cable was invented, the idea was that the braid could block external interference coming into the cable, if there is not enough braid (90%) or the material is of poor quality external interference can cause serious problems in the image.
It is also necessary to respect the correct distances of the cables according to the type used, cables such as RG59, RG6, RG11 have their distance limitations.
UTP cables
When the camera is installed using UTP cables (network cable) with the use of baluns on the tips, it is necessary to make sure that the quality is enough to not cause problems of noise and interference in the image.
The most traditional UTP cables on the market are category 5e known as cat5e, but I've seen situations where even the use of cables in this category have brought problems because they are of poor quality.
3. Using poor quality cameras
There are cases where the camera has poor quality and provides bad images no matter what you try to improve. It is important therefore to buy the cameras that meet the minimum requirements for your project.
Unbranded cameras usually at very low cost do not deliver the quality you need for your CCTV project, especially in adverse conditions such as in low light situations.
Ideally, you should purchase cameras that have a brand, product manual, and a phone number for technical support, if you do not have it at the time of purchase, you will eventually face serious image problems.
4. Use of poor quality converters
If you are using cat5e or Cat6 UTP cables with baluns, be aware of the camera's technology type as there are baluns suitable for use with HDCVI, HDTVI or AHD. Choose the ideal product for your installation.
If you want to know more about the technologies HDCVI, HDTVI and AHD read the article: HD-TVI, HD-CVI and AHD comparison.
Also be aware of the maximum distance that the product can be used for the chosen technology, read the manual of the balun and the camera.
Usually, the balun brings an informative table with the distance that can be used for AHD and CVI that is around 300m. For TVI this distance is 200m for most products on the market.
5. Incorrect grounding
If grounding is done improperly, you may see bands rolling on the screen, if this is the case, there is an interference problem called the ground loop.
This problem basically occurs when the camera, DVR or power source groundings are made at distinct points that have different resistances, this causes an effect called a ground loop.
To solve the ground loop problem simply ground the equipment to the same common point (ground bus) or leave one side (camera) without contact with the ground.
A practical example would be to place a wood, plastic or other insulation material on the back of the camera mounting bracket so that it does not come in direct contact with the post or wall that is installed.
There's also a solution with ground loop isolators that can easily eliminate the problem. Just take look in an example in this link.
==> To learn more, read the article: How to fix the CCTV ground loop.
6. Camera Warm Up
When the CCTV camera becomes warm, the noise begins to appear in the image, this is due to the type of camera that sometimes can not dissipate the heat (due to its poor quality of manufacture).
Heating may also occur due to lack of adequate ventilation for the camera when it is installed inside enclosures or in high-temperature environments due to sunlight, or another heat source.
7. Poor connections
Imagine a situation where camera connectors are poorly made, or suddenly the power supply is poorly installed and causing all sorts of poor contact, this will certainly translate into camera interference.
Always check the power supply and coaxial cable connections as intermittent problems may arise with these poorly made connections.
Do not be in a hurry when making and checking a connection, always imagine that a job well done will ensure the smooth operation of the system and avoid a headache. The quality is in the smallest details of your CCTV project.
8. Inadequate lighting
For the image to be generated it is necessary that there is enough light in the environment, this is a principle that applies to all types of cameras, such as camcorder, CCTV camera or even your cell phone.
Note that when you are using your phone to take a picture or record a video in dark places, the noise is always present.
Understand that this process is natural and all cameras will have this problem with low illumination, but when the camera has more quality (obviously it is more expensive), this problem is minimized.
The larger the camera's image sensor the better the image in low-light conditions, there are cameras on the market that use 1/4 "(inches) sensors which is small and has smaller area to receive the light rays than a 1/3 ", there are professional cameras that work with sensors larger than 1/2" and sometimes even larger.
Check out the sensor size of your camera to compare with other models in the market, this knowledge helps at the time of purchase.
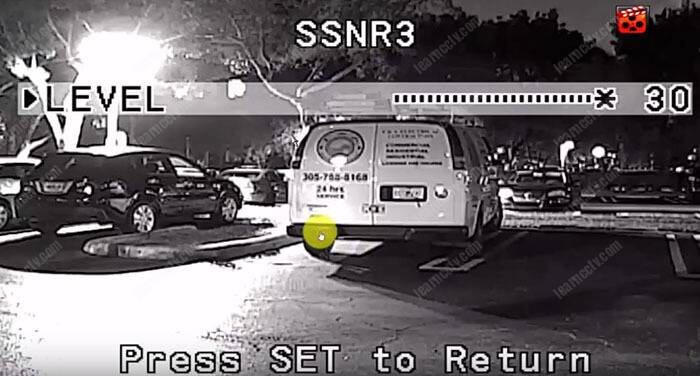
There are also camera features (depending on the model) that allow you to decrease the noise in the picture through the menu setting.
Usually, this technology has names like SNR, SSNR, DNR or something like that. The letter "N" comes from the word "noise".
The acronym SNR, for example, is of Super Noise Reduction. The other acronym is similar and used in Samsung cameras, so the SSNR is Samsung Super Noise Reduction is the same as SNR technology, but using the name of the manufacturer (Samsung).
Conclusion
No matter what problem you are experiencing, there is always a solution for you, just look at the situation to find out what is causing interference or noise in the images.
Remember that there are situations where noise is normal, such as in low light conditions and in this case, the only way to solve is using traditional or infrared lighting.
Want to learn more ?
If you want to become a professional CCTV installer or designer, take a look at the material available in the blog. Just click the links below:
Please share this information with your friends...
