So, you want to connect your CCTV camera to a TV but have no idea how to it, right ? You are in the right place, in this article you'll learn how to do that.
If you have a traditional analog camera is just a question of following the step by step I'm about to you here. So keep reading to end...
What you need for the installation
The procedure of installing security camera on the TV is very simple, you just need few components as described below:
Use the correct type of CCTV camera
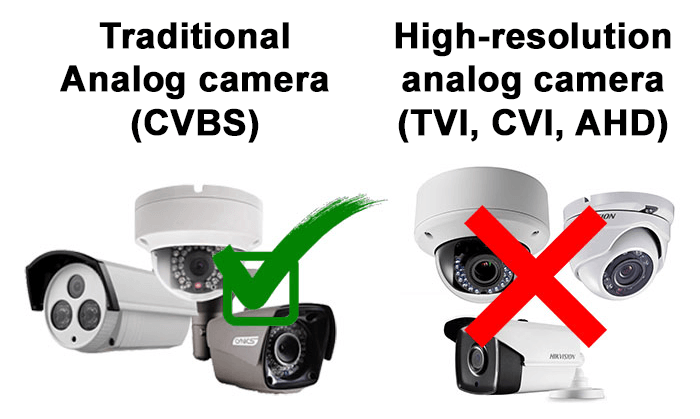
To install a CCTV camera on the TV, the first thing you should know is what type of camera you have purchased. I'll explain the procedure for traditional analog cameras with signals that are supported by the TV.
You can't use the high-resolution analog cameras with HD-TVI, HD-CVI and AHD technology, because they are not compatible with your regular TV.
If you have this type of cameras, you will need an extra device to install them on your TV and that's not the subject of this article.
To learn more about those cameras read: HD-TVI, HD-CVI, AHD comparison
So, the camera you'll learn to install on your TV in this article is the one with the CVBS (Composite Video Baseband Signal) technology. But don't worry, this is just a fancy name for a traditional analog CCTV camera.

When you get to the closest CCTV store or look for a traditional analog CCTV camera on Ebay or any other online store, you'll see the seller ADs with the information about a 600 TVL (TV lines) camera or something similar to that. If you see that kind of information your are on the right track.
Example of a traditional analog CCTV camera
It doesn't matter if the camera model is Dome, Bullet or Box (as shown in the photo). The important thing is to identify if the camera uses a traditional CVBS technology, you can check that information on the camera itself, in the catalog or product manual. See the picture below:
A CCTV camera can also have 480, 540, 600, 700 TV lines.
See below an example of the information the camera catalog
Cables, connectors and other accessories to install the CCTV camera on TV
So, you have the correct security camera, now it's time to prepare for the installation and make sure you also have all the the accessories.
Take a look at the list below to understand what you need.
RG59 siamese coaxial cable
With a RG59 siamese coaxial cable is possible to send video signal and power over at the same time due to the way the cable is constructed.
BNC connector
BNC connectors can be used on each side of the coaxial cable. There are different models available in the market, as shown in the figure:
BNC to RCA adapter
To connect the CCTV camera to a TV you need to adapt the BNC connector to RCA which is the input available on the TV. See an example of this type of adapter in the image below:
Power Jack Plug Adapter Connector
Power Jack Plug Adapter connectors are used for power connection. Just connect it to the cable and to the power supply and CCTV camera.
Power supply
There are different types of power supplies for CCTV cameras, some of them come with protection boxes and fuses.
See the step-by-step guide on how to install CCTV camera on TV
Step 1: Install your CCTV camera
Choose the appropriate model for your installation. The most common options are mini dome and bullet, Attach the camera to the wall or ceiling and proceed with the cable connection.
For more details see: The Ultimate Security Camera Guide V1
Step 2: Connect the CCTV cable to the camera
Make proper BNC connection to your coaxial cable with attention to the details so you'll not have problems with bad connections. Also make sure that the braid in not in contact with the center conductor.
For more details see: The Ultimate Security Camera Guide V1
Step 3: Use the P4 connector to power the camera
Make the proper connection from the P4 connector to the power supply and CCTV camera, paying attention to the correct cables polarity to not damage your CCTV camera.
For more details see: The Ultimate Security Camera Guide V1
Step 4: Connect the power supply to the camera
Connect the power supply correctly to the CCTV camera, always respecting the correct polarity. Don't be afraid it's an easy connection, just do it right.
For more details see: The Ultimate Security Camera Guide V1
Step 5: Connect the camera to the TV
Using the BNC to RCA adapter, connect the CCTV camera to the TV in the standard video input. (Audio and video input).
For more details see: The Ultimate Security Camera Guide V1
Step 6: Turn on the TV and select AV input
Select the audio and video (AV) input on your TV. The image should appear on the screen.
For more details see: The Ultimate Security Camera Guide V1
Conclusion and installation considerations
In the process of installing a CCTV camera on a TV, remember that it is necessary to use a traditional camera (CVBS). As mentioned earlier, do not try to use HD-TVI, HD-CVI, and AHD cameras.
Be careful when handling the power supply and make sure the polarity is correct. Please don't rush, just be patient to connect and install everything.
If you want to learn more about DYI installation or even became a better CCTV camera installer take a look at the Ultimate Security Camera Guide.
Please don't forget to share the information, click the link below
Want to learn more ?
If you want to become a professional CCTV installer or designer, take a look at the material available in the blog. Just click the links below:
Please share this information with your friends...
