When you purchase IP security cameras, you can record the footage into an NVR (Network Video Recorder). Let's talk about how that works.

There are a huge number of different IP cameras and NVR in the market, but the principle of IP camera and NVR configuration is similar to most of them.
In this article, I explain how to configure Hikvision IP camera with NVR model DS-7616NI-I2-16P-4k-POE, which is a 16 channel device for 4K IP cameras.
The Hikvision NVR DS-7616NI-I2-16P-4k-POE
The first thing you have to do is to understand your device, so let's take a look at the specification of the Hikvision NVR.
This is a 16 channel NVR, which means it can handle up to 16 4K resolution IP cameras that can be directly connected to the device using UTP cables.
People usually buy the NVR and the cameras from the same manufacturer, but it's not mandatory to use the same brand since most of the modern IP cameras have the ONVIF protocol which allows the communication between different brands,
I strongly recommend you to read the article about the ONVIF protocol to understand how it works in case you want to use different IP camera brands.
Hikvision NVR DS-7616NI-I2-16P-4k-POE Back part
Take a look at the following picture which shows the details of the Hikvision NVR, you can see all the connections in the back part of the device.
On the left side, it's possible to see the 16 Ethernet ports that are used to connect the cameras. Those ports use PoE (Power Over Ethernet) to power up the cameras. It's not necessary to use an extra power supply.
(Please read the article: PoE switch for IP cameras to learn more)
The next connections available are for Audio IN/OUT, which can be used to connect a microphone and a speaker respectively. Most of the time, people don't use such connections because the NVR can use the audio from the IP cameras.
The I/O port is used to connect to sensors and to activate external devices, you can connect a door sensor for example that will send a signal to the NVR that can trigger events such as camera recording, email notifications, etc.
Based on events, such as motion detection and others. the NVR can also turn on/off a light, a buzzer or something else that is connected to the output port.
The VGA and HDMI ports are used to connect monitors.
A USB port is available for the NVR firmware upgrade and to export recorded footage into a thumb drive.
There is a LAN Port to connect the NVR to the network, so you can have remote access from a computer, laptop or mobile device. This port is usually connected to a network switch or a router which is connected to the Internet.
Hikvision NVR Network Diagram
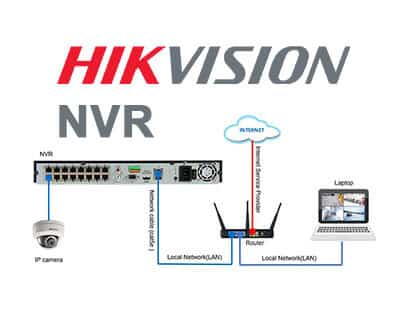
See the following diagram which shows the DVR connection in the network.
In the left side, you can see a Hikvision IP camera connected to one of the PoE ports, it's not necessary to use an individual power supply to the camera since it's power up via the network cable (using Power over Ethernet).
The idea is to connect all other IP cameras exactly the same way.
A network cable is connected to the NVR LAN port and to the router, which allows remote access to the device via laptop. It's also possible to have access to the NVR via the Internet since the router is linked to an Internet Service Provider (ISP).
The diagram shows the network connection, obviously, you need also to connect the power cable (which comes with the device) to power up the NVR.
Hikvision NVR Initial Setup
After connecting the NVR and the IP camera, it's time to start the setup.
It's easier to connect a monitor and a mouse to the NVR for the initial configuration and later you can use your laptop for additional configuration.
See the picture below which shows the front part of the NVR with the power LED and the hard drive LED on. A USB mouse is connected to the device.
After connecting the mouse and monitor, just power up the device and look at the screen, the first thing that appears is the Hikvision logo, that indicates that the NVR is booting up. (see the picture below).
In the next screen, just choose the language and click the Apply button.
The next step is to create a password. Just do it and click OK.
You can also create an unlock pattern to secure the NVR.
Hikvision NVR Wizard Setup
After the initial setup, you can use a Wizard Setup for the next steps.
Just follow the instructions and move to the next screen until you get to the end of the process. It's really very easy, take a look at the following pictures.
The 1st step is to configure the timezone, just the one you want and click next.
The 2nd step is to configure the NIC (Network interface card) with the correct IP, just choose the IP that is in your local network range.
Let's say for example that your computer has the IP 192.168.1.1. You can choose the IP 192.168.1.x for your NVR and replace the X with the number 2 to 254 as long as no other device is using the same IP on your network.
In the 3rd step just check if the hard drive is OK. The NVR suppose to come with an internal HDD (Hard Drive Disc), or you have to install one before turning it on.
In the 4th step, you will see the IP cameras that are available in your network since the NVR can find them by using a scan process.
At first, you can just skip the 5th step that is for the remote access configuration. This process involves a little extra configuration, so you can work at that later.
The 6th step and final step is to just change the password. Please choose a strong one the is not easy to guess, so your NVR will be better protected.
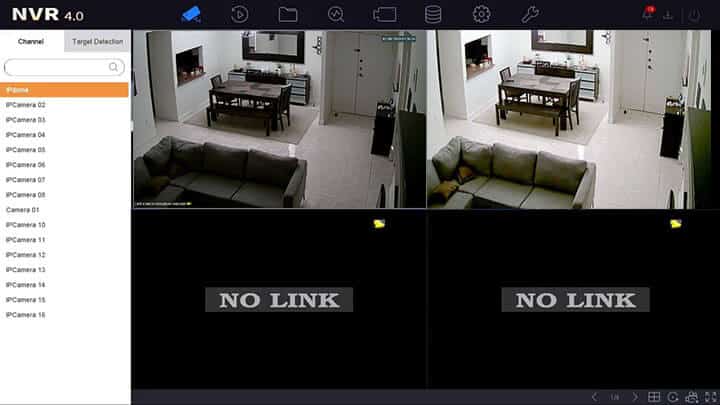
After all the steps above the NVR will show you the IP cameras in the monitor and it will start recording everything with a basic configuration that can be changed later according to your needs.
The picture above shows only 2 IP cameras that were connected to the NVR during the installation process. You can connect up to 16 cameras in the same way.
After finishing the installation just go to the main menu to see the live view.
Conclusion
As you can see, it's not that hard to configure an NVR to work with the IP cameras, you just need to follow a step-by-step process and everything will be running in a short period of time as long as you have basic skills to setup everything.
If you want to learn more about IP CCTV and become a better professional, just take a look at the Ultimate Security Camera Guide Volume 3.
Now that you know how to configure Hikvision IP camera with NVR, please share this information with your friends. Just click in one of the buttons below.
